Free OCR API
Get Your Free OCR API Key
Register here for your free OCR API key. The OCR API provides a simple way of parsing images and multi-page PDF documents (PDF OCR) and getting the extracted text results returned in a JSON format. The OCR API has three tiers/levels. The free OCR API plan has a rate limit of 500 requests per day per IP address to prevent accidental spamming. The PRO and PRO PDF plans do not have such a limit.
For even faster response times and guaranteed 100% uptime PRO plans are available.
The PRO OCR API operates on servers separate from the free OCR API service.
You receive the URLs for the global PRO endpoints and your API key in the welcome email directly after
you have signed-up for the PRO or PRO PDF account.
The PRO OCR API is also available as locally installable on-premise OCR software.
| API Plan | Free | PRO | PRO PDF | Enterprise |
|---|---|---|---|---|
| Pricing | Free | $30/month | $60/month | $999+/month |
| Sign-Up& Get API Key | Register for free API key |
Buy PROAPI Key | Buy PRO PDFAPI Key | Contact Sales |
| Requests/month | 25,000 | 300,000 | 300,000 | Custom |
| File Size Limit | 1 MB | 5 MB | 100 MB+ | 100 MB+ |
| PDF Page Limit | 3 | 3 | 999+ | 999+ |
| Searchable PDF Creation | Yes (with watermark) | Yes | Yes | Yes |
| Speed | Fast | Faster (more servers, lower load) | Fastest | |
| Service-level agreement (SLA) | n/a | 100% uptime or money back(dedicated, redundant servers) | Custom OCR fine tuning | |
You can check the API performance and uptime at the API status page.
Now it's time to get started: Below you find example code for calling the API from Postman, AutoHotKey (AHK), cURL,
C#, ASP.NET,
Delphi,
iOS, Java (Android app),
Node.JS NPM, Python, C++/QT,
Ruby,
and Javascript. (If you have code examples for other languages, please let us know and we will add them to this list).
Faster OCR with the PRO plans
For our OCR PRO plans we use redundant high-performance API endpoints in the US, EU and Asia regions. We guarantee 100% uptime or money back. Our hosted PRO OCR plans:
-
-
Monthlyplans, cancel anytime. To subscribe, please see the links in the table above. If the embedded checkout does not work in your browser, please use our classic web store for the PRO and PRO PDF plans. -
-
Yearlypre-paid plans with a 20% discount (Order PRO yearly and Order PRO PDF yearly) -
-
CustomOCR server (starting at US$ 999/month). We set up dedicated OCR servers specifically for your data. We can fine-tune the recognition logic to your needs—accurately identifying checkboxes, math, formulas, symbols, tables, specific layouts, or even handwriting. Custom servers include unlimited conversions (limited only by hardware capacity). Contact us for a quote
In addition to connecting to our PRO OCR servers, you can also directly buy our OCR software and host it yourself. This option is described in the next paragraph below.
OCR.space Local Self-hosted, On-Premise OCR Server
| OCR.space Local - Enterprise Image and PDF OCR |
|---|
|
OCR.space is powerful server-based OCR software for automated document capture and PDF conversion.
With OCR.space Local you can install and host our popular OCR API and Searchable PDF creation software on your own PC and/or inside your data-center.
The installation on virtualized and cloud environments like Amazon AWS AMI or Microsoft Azure is fully supported.
Technically the local OCR server is identical to our popular online OCR API service. Switching from cloud to on-premise or vice-versa
requires no code changes.
The on-premise version has the same features, same API parameters and the same OCR quality as the OCR.space PRO PDF plan, but runs 100% local and offline - it never contacts the Internet. |

|
| For more information and to order OCR.space Local licenses please contact sales. |
The Free OCR API Endpoint (POST)
Free OCR APIhttps://api.ocr.space/parse/image
The API supports https:// (SSL) and plain http:// connections.
"GET" OCR API Endpoint
Using an OCR API was never easier...
Besides the full-featured "POST" OCR API at /parse/image we provide an additional OCR API endpoint
at /parse/ImageUrl for GET requests. While not as versatile as the POST API,
it is easy to use. Everything you need for the api call is inside the URL.
Example (just click the link to start the OCR):
https://api.ocr.space/parse/imageurl?apikey=helloworld&url=https://dl.a9t9.com/ocr/solarcell.jpg
The default OCR language is English. To use another language, add &language to the url. You can also request the x/y word coordinates with isOverlayRequired:
https://api.ocr.space/parse/imageurl?apikey=helloworld&url=https://dl.a9t9.com/ocr/solarcell.jpg&language=chs&isOverlayRequired=true
The important limitation of the GET api endpoint is it only allows image and PDF submissions via the URL method, as only
HTTP POST requests can supply additional data to the server in the message body. GET requests include all
required data in the URL. So by design, a GET api cannot support file uploads (file parameter)
or BASE64 strings (base64image).
The GET API is easy and fast to use. Just note that the URL with the api key might be stored in your browser's history. But this is not a security problem because even if somebody gains access to your personal API key, he or she can not access any information about you or the OCR'ed documents, because we do not store such information in the first place. The worst-case scenario is that somebody uses all your free conversions. If this might be a problem for your application, simply continue to use the fully SSL-encrypted POST version of the API or switch to the PRO OCR API, which provides additional options.
Post Parameters
The table below lists all possible API parameters. As additional documentation, we published a sample api call collection that you can load into Postman. And last but not least: Our free online ocr form on the front page is nothing else than a POST call to the free OCR API endpoint and can be used for testing as well.
| Key | Value | Description |
|---|---|---|
apikey |
API Key (send in the header) | Get your free API key |
url or file or base64Image |
url: URL of remote image file (Make sure it has the right content type)file: Multipart encoded image file with filenamebase64Image: Image or PDF as Base64 encoded string
|
You can use three methods to upload the input image or PDF. We recommend the URL method for file sizes > 10 MB for faster upload speeds. |
language
|
[Optional] Arabic= araBulgarian= bulChinese(Simplified)= chsChinese(Traditional)= chtCroatian = hrvCzech = czeDanish = danDutch = dutEnglish = engFinnish = finFrench = freGerman = gerGreek = greHungarian = hunKorean = korItalian = itaJapanese = jpnPolish = polPortuguese = porRussian = rusSlovenian = slvSpanish = spaSwedish = sweThai = thaTurkish = turUkrainian = ukrVietnamese = vnmAUTODETECT LANGUAGE = auto (Engine 2 only) |
Language used for OCR. If no language is specified, English eng is taken as default.IMPORTANT: The language code has always 3-letters (not 2). So it is "eng" and not "en".
Engine2 has automatic language detection. Use the value language=auto to enable it.
More can be added on request.
|
isOverlayRequired |
[Optional] Boolean value |
Default = FalseIf true, returns the coordinates of the bounding boxes for each word. If false, the OCR'ed text is returned only as a text block (this makes the JSON reponse smaller). Overlay data can be used, for example, to show text over the image. |
filetype |
[Optional] String value: PDF, GIF, PNG, JPG, TIF, BMP | Overwrites the automatic file type detection based on content-type. Supported image file formats are png, jpg (jpeg), gif, tif (tiff) and bmp. For document ocr, the api supports the Adobe PDF format. Multi-page TIFF files are supported. |
detectOrientation |
[Optional] true/false |
If set to true, the api autorotates the image correctly and sets the
TextOrientation
parameter
in the JSON response. If the image is not rotated, then TextOrientation=0, otherwise it is the degree of the rotation, e. g. "270".
|
isCreateSearchablePdf |
[Optional] Boolean value | Default = FalseIf true, API generates a searchable PDF. This parameter automatically sets isOverlayRequired = true. |
isSearchablePdfHideTextLayer |
[Optional] Boolean value | Default = False. If true, the text layer is hidden (not visible) |
scale |
[Optional] true/false | If set to true, the api does some internal upscaling. This can improve the OCR result significantly, especially for low-resolution PDF scans. Note that the front page demo uses scale=true, but the API uses scale=false by default. See also this OCR forum post. |
isTable |
[Optional] true/false | If set to true, the OCR logic makes sure that the parsed text result is always returned line by line. This switch is recommended for table OCR, receipt OCR, invoice processing and all other type of input documents that have a table like structure. |
OCREngine |
[Optional] 1 or 2 | Engine 1 is default. See OCR Engines. |
Tip: When serving images from an Amazon AWS S3 bucket, Google cloud storage or a similar services for use with the "URL" parameter, make sure the file link has the right content type.
It should not
be "Content-Type:application/x-www-form-urlencoded" (which seems to be the default for AWS) but image/png or similar for images. For PDF documents make sure the content type is
not "image/pdf" but application/pdf. You can check the content type of your links for example with
this MIME content type checker (external service, not from us). The OCR API uses the content type to automatically detect the correct file.
But if you have the wrong content-type and can not change it (e.g. because you do not control the cloud storage), no problem:
In this case you can overwrite the automatic file type detection by adding the
the filetype= parameter and tell the API directly what type of document you are sending (PNG, JPG, GIF, PDF).
New: If you need to detect the status of checkboxes, please contact us about the Optical Mark Recognition (OMR) (Beta) features.
Select the best OCR Engine
The OCR API offers different OCR engines with different processing logic. We recommend that you try them all and then use whatever engine gives you the best OCR result. You can easily compare all OCR engines with our online OCR portal on the front page and with the OCREngine=1/2 parameter in your API call.
Features of OCR Engine 1:
- - Supports many languages (including Asian languages like Chinese, Japanese and Korean)
- - Fastest OCR
- - Supports larger images
- - Multi-Page TIFF scan support
- - Parameter: OCREngine=1
Features of OCR Engine 2:
-
- Language autodetection (Use language code
autoto enable the detection) -
- Very good text recognition for special characters like
§$@$€/()[]{} - - Very good text recognition for text on confusing backgrounds e. g. text on images, road signs,license plates, Memes or even some CAPTCHA.
- - Supports Western Latin Character languages (English, German, French,...) and Chinese OCR
- - Usually better at single number OCR, single character OCR and alphanumeric OCR in general (e. g. SUDOKO, Dot Matrix OCR, MRZ OCR, Single digit OCR, Missing 1st letter after OCR, ... )
- - Usually better with rotated text (Forum: Detect image spam)
- - The recognition logic works different than OCR Engine 1. So if you have a situation where E1 can not read your image/document correctly, try it with Engine2 - it might work!
- - Parameter: OCREngine=2
Features of OCR Engine 3:
-
-
Extremely good text recognition. Retains original formatting with markdown notation -
- Supports more than
200 OCR languages. Language autodetection. Use language codeauto, other language codes return an error. -
-
Handwriting OCR recognition - - Automatic table and layout recognition. Tables are returned in markdown format.
- - Checkbox recognition: ☐,☑
- - The main drawback is the slower OCR speed for larger images/PDF. The bigger the image, the slower the processing becomes compared to Engine1 and Engine2
- - No overlay data available. The "isOverlayRequired" parameter is ignored. Contact tech support if you need this.
- - No support to create searchable PDF. The "iscreatesearchablepdf" parameter is ignored. Contact tech support if you need this.
- - This OCR engine is still in development. It might be down sometimes. It has no uptime guarantee (yet).
- - Feedback is welcome in the OCR API Forum - let us know what you think about it and how you use it.
- - Parameter: OCREngine=3
The returned OCR result JSON response format is identical for all OCR engines. So changing the OCR engine requires no code changes. You only need to change the OCR engine parameter "OCREngine=1 [or 2 or 3]".
The overall OCR API features e. g. detect orientation, receipt scanning and PDF OCR/searchable PDF creator are the same for all OCR engines. If you have any question about using the different OCR engines, please ask in our OCR API Forum.
Response
The API returns results in JSON format. The result typically contains the ExitCode, Error details (if occurred) and a bunch of parsed results for the Image / PDF pages. Please check below the response the Web API returns and definition of various parameters. The illustration below shows success and error responses.
{
        "ParsedResults" : [
            {
                "TextOverlay" : {
                    "Lines" : [
                        {
                            "Words": [
                                {
                                "WordText": "Word 1",
                                "Left": 106,
                                "Top": 91,
                                "Height": 9,
                                "Width": 11
                                },
                                {
                                "WordText": "Word 2",
                                "Left": 121,
                                "Top": 90,
                                "Height": 13,
                                "Width": 51
                                }
                                .
                                .
                                .
                                More Words
                            ],
                            "MaxHeight": 13,
                            "MinTop": 90
                        },
                        .
                        .
                        .
                        .
                        More Lines
                    ],
                "HasOverlay" : true,
                "Message" : null
                },
                "FileParseExitCode" : "1",
                "ParsedText" : "This is a sample parsed result",

                "ErrorMessage" : null,
                "ErrorDetails" : null
            },
            {
                "TextOverlay" : null,
                "FileParseExitCode" : -10,
                "ParsedText" : null,

                "ErrorMessage" : "...error message (if any)",
                "ErrorDetails" : "...detailed error message (if any)"
            }
            .
            .
            .
            ],
        "OCRExitCode" : "2",
        "IsErroredOnProcessing" : false,
        "ErrorMessage" : null,
        "ErrorDetails" : null
        "SearchablePDFURL": "https://....." (if requested, otherwise null)
        "ProcessingTimeInMilliseconds" : "3000"
    }
| Key | Value | Description |
|---|---|---|
ParsedResults |
OCR results | The OCR results for the image or for each page of PDF. For PDF: Each page has its own OCR result and error message (if any) |
OCRExitCode |
Integer |
The exit code shows if OCR completed successfully, partially or failed with error1: Parsed Successfully (Image / All pages parsed successfully)2: Parsed Partially (Only few pages out of all the pages parsed successfully)3: Image / All the PDF pages failed parsing (This happens mainly because the OCR engine fails to parse an image)4: Error occurred when attempting to parse (This happens when a fatal error occurs during parsing ) |
IsErroredOnProcessing |
true/false | If an error occurs when parsing the Image / PDF pages |
ErrorMessage |
Text | The error message of the error occurred when parsing the image |
ErrorDetails |
Text | Detailed error message |
SearchablePDFURL |
Link | See Searchable PDF |
| IMAGE / PAGE PARSING RESULT | ||
FileParseExitCode |
Exit code for each parsed result |
The exit code returned by the parsing engine0: File not found1: Success-10: OCR Engine Parse Error-20: Timeout-30: Validation Error-99: Unknown Error
|
ParsedText |
Parsed Text | The parsed text for an image |
TextOverlay |
Overlay data for the text in the image/pdf | Only if 'isOverlayRequired' is set to 'True' |
Lines |
An array of lines in the overlay text | This contains an array of all the lines. Each line will contain an array of words |
Words |
An array of words in a line | This contains the words with the specific details of a word like its text and position |
WordText |
Text of the word | This contains the text of that specific word |
Left |
Distance of word from left (in pixels (px)) | Contains the distance (in px) of the word from the left edge of the imagee |
Top |
Distance of word from top (in px) | Contains the distance (in px) of the word from the top edge of the image |
Height |
Height of the word | Contains the height (in px) of the word |
Width |
Width of the word | Contains the width (in px) of the word |
MaxHeight |
Maximum height of the line | Contains the height (in px) of the line |
MinTop |
Minimum distance of the line from the top edge of image | Contains the distance (in px) of the line from the top edge in the original size of image |
HasOverlay |
Overlay is present or not | True/False depending upon if the overlay for the parsed result is present or not |
ErrorMessage |
Text | Error message returned by the parsing engine |
ErrorDetails |
Text | Detailed error message returned from the parsing engine for debugging purposes |
Searchable PDF
You can create searchable PDFs (sometimes also called Sandwich PDFs) directly via the API. The PDF is returned as download link
in the API JSON response the form of "SearchablePDFURL": "...".
The download link is valid for one hour, after this time the document is deleted from our OCR servers.
The isCreateSearchablePdf = true switch triggers the generation of the searchable PDF. By default,
the added text layer is visible - - this is ideal for testing the result as you can compare the OCR'ed output directly with the scan image.
By adding isSearchablePdfHideTextLayer = true you make the text layer invisible.
Creating a searchable PDF from the OCR result takes additional processing time, so you should only activate this
feature if you need the OCR result in PDF format.
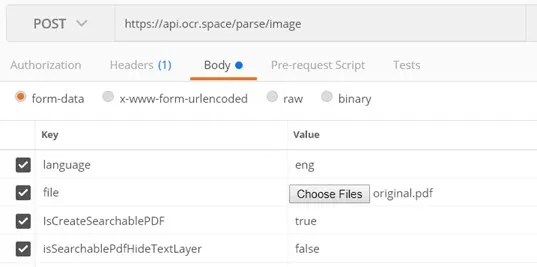
NOTE: You must use both parameters, isCreateSearchablePdf = true and
isSearchablePdfHideTextLayer = false or true, otherwise the generated PDF contains no text layer.
When used with the free OCR API tier, the generated PDF contains a watermark "Generated by OCR.space" in the lower right corner. With the PRO OCR API, no watermark is added to the PDF.
Code Examples
The fastest way to test the OCR API is to make a GET call - just copy the URL in your web browser.
Test API with the Postman App
Getting started: Use the free Postman app for Windows, Mac and Linux to test the OCR API and play with the different parameters.
Tip: If you have Postman installed you can click the "Run in Postman" button above to import a set of six API test calls to Postman.
The samples use the "helloworld" api key and are ready to run without any further edits.
(a) Provide image/PDF to be OCR'ed via URL
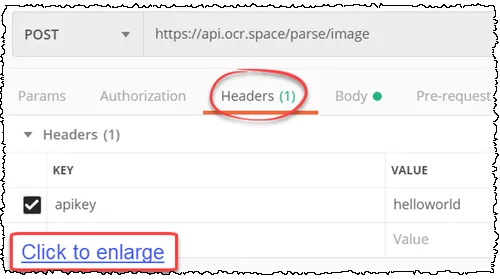
The screenshots below show the settings for sending the image/PDF via a URL. Note that the encoding is set to multipart/form-data.
In all cases (file upload via URL, file or base64) the api key (password) is sent in header:
(b) Upload image/PDF to be OCR'ed from your server/PC
Same Postman app, but this time we are using the "File" setting to upload the image or PDF.
(c) Send image as Base64 string
Same Postman app, but this time, we are using the "Base64Image" parameter to send the image as string.
Tip: Make sure there is no extra "new line" after pasting a base64 string into Postman. If there is, the API will (rightfully) return a "Not a valid base64 image." error.
Test BASE64 strings
The links open a text file in the browser: Image Base64 String, TIFF Base64 String, PDF as Base64 string. You can copy and paste the content of these text files directly into the "base64image" field of Postman, or any other test code.
Important: The base64 string must start with the content type of the document. For example use data:image/jpeg;base64,data string here,
data:image/png;base64,data string here or for PDF documents data:application/pdf;base64,data string here. Most online image to base64 conversion services do not
add this header, they just provide the raw data string. Thus you must add it manually when you use such strings for testing.
cURL command-line
(a) Provide image/PDF to be OCR'ed via URL
curl https://api.ocr.space/Parse/Image -H "apikey:helloworld" --data "isOverlayRequired=true&url=http://dl.a9t9.com/blog/ocr-online/screenshot.jpg&language=eng"
curl is an open source command line tool and library for transferring data with URL syntax. The libcurl library is portable. It builds and works identically on nearly any platform (Windows, Mac, Linux,...).
(b) Upload image/PDF to be OCR'ed from your server/PC
curl -H "apikey:helloworld" --form "file=@screenshot.jpg" --form "language=eng" --form "isOverlayRequired=true" https://api.ocr.space/Parse/Image
Note: @screenshot.jpg assumes an image with name "screenshot.jpg" is in the same directory as cURL.exe. Note that the isOverlayrequired (default: no) and the language (default: eng) parameters are optional.
(c) Send image as string in Base64 format
curl -H "apikey:helloworld" --form "base64Image=data:image/jpeg;base64,/9j/AAQSk [Long string here ]" --form "language=eng" --form "isOverlayRequired=false" https://api.ocr.space/parse/image
The base64 string in this example is truncated. You can download the full command line as Windows batch file from GitHub.
We have some test base64 strings available for download.
C# (Visual Studio Project)
There is a ready-to-use Visual Studio C# sample project for using the OCR API from C# on GitHub.
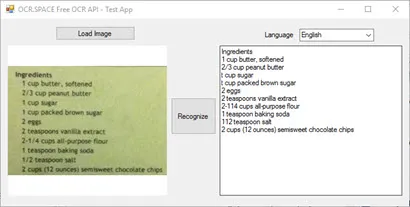
The test app allows you to upload and test any image quickly with the OCR API.
For a real-life example, look at the popular "ShareX" productivity tool:

ShareX uses the OCR.space PRO API and the full C# source code is available.
iOS: Objective-C and Swift
The user-provided code snippets for Objective-C and Swift are a good starting point for iPhone apps with OCR features.
Android: Java
Using Android? Look at this Android sample app
that uses the free OCR API. The
Java
app shows how to call the API using HttpsURLConnection from user "bsuhas". And here
is another, different Java repo from user "Globalizer". Thanks to both for providing this code snippet.
PHP OCR API Demo Web App
For PHP we have a complete, ready-to-run demo web app that allows the user to select a document and then uploads the image or PDF document to the OCR API.

You find the
full source code at Github
.
Python
Here is an example of how to access the API from Python using the requests.post command.
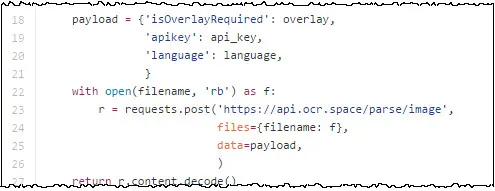
The full source code can be found on GitHub (thanks to user "Zaargh" for providing this code snippet). Another Python wrapper for our OCR SDK is available from GitHub user a4fr (thanks to everyone for creating code snippets).
Also, we created Python code to draw the overlay on top of the input image. This can be very useful for testing
and visualizing the OCR result:

AutoHotKey (AHK)
AHK is a popular Windows Macro Recorder. For windows automation projects that require to
recognize text on images you can connect to the OCR API with CreateFormData(PostData, ContentType, oForm).
This AHK forum post has the details.
C++/QT
Using C++? Jhiroka from UCLA shared this example with us: C++/QT OCR API sample app.
If you are using the C++ Casablanca Library for the HTTP POST call, note that you need to url encode the image data on top of Base64 encoding.
The C++ library Casablanca does not seem to do this automatically (unlike Postman does), so use the function web::uri::encode_data_string
to encode the file data after Base64 encoding the request.
Go
User Matteo made a Github repository with a Go module for the OCR API.
Ruby
Using Ruby? Suyesh shared this Ruby gem (library) with us: OCR API Ruby gem.
Perl
Using Perl? Then have a look at this OCR API user submitted Perl OCR.space module.
Powershell
We have a Powershell OCR code snippet. This includes downloading the generated sandwich PDF.
Javascript
Chrome extension
The open-source Copyfish Chrome, Edge and Firefox extension uses our OCR API. You find its Javascript source code here. This includes code that shows how to process the returned text overlay data. Note the Copyfish extension uses the PRO OCR API version.
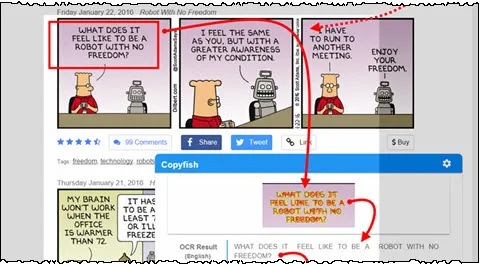
Test it: You can install the Copyfish OCR extension in Chrome, Edge, and Firefox.
NPM/Node.js
The latest OCR API Node.JS wrapper is from user DavideViolante. It allows you to specify the OCR Space API endpoints (Free and PRO). Older Node.JS wrappers: User Dennis.K published a NPM package for the OCR API and Anthony Luzquiños released an updated NPM package for the OCR API.
Jquery
This is a JQuery example showing how to make a request to the api using AJAX and get the image results for processing.
- //Prepare form data
- var formData = new FormData();
- formData.append("file", fileToUpload);
- formData.append("url", "URL-of-Image-or-PDF-file");
- formData.append("language" , "eng");
- formData.append("apikey" , "Your-API-Key-Here");
- formData.append("isOverlayRequired", True);
- //Send OCR Parsing request asynchronously
- jQuery.ajax({
- url: https://api.ocr.space/parse/image,
- data: formData,
- dataType: 'json',
- cache: false,
- contentType: false,
- processData: false,
- type: 'POST',
- success: function (ocrParsedResult) {
- //Get the parsed results, exit code and error message and details
- var parsedResults = ocrParsedResult["ParsedResults"];
- var ocrExitCode = ocrParsedResult["OCRExitCode"];
- var isErroredOnProcessing = ocrParsedResult["IsErroredOnProcessing"];
- var errorMessage = ocrParsedResult["ErrorMessage"];
- var errorDetails = ocrParsedResult["ErrorDetails"];
- var processingTimeInMilliseconds = ocrParsedResult["ProcessingTimeInMilliseconds"];
- //If we have got parsed results, then loop over the results to do something
- if (parsedResults!= null) {
- //Loop through the parsed results
- $.each(parsedResults, function (index, value) {
- var exitCode = value["FileParseExitCode"];
- var parsedText = value["ParsedText"];
- var errorMessage = value["ParsedTextFileName"];
- var errorDetails = value["ErrorDetails"];
- var textOverlay = value["TextOverlay"];
- var pageText = '';
- switch (+exitCode) {
- case 1:
- pageText = parsedText;
- break;
- case 0:
- case -10:
- case -20:
- case -30:
- case -99:
- default:
- pageText += "Error: " + errorMessage;
- break;
- }
- $.each(textOverlay["Lines"], function (index, value) {
- ..........................
- ..........................
- ..........................
- LOOP THROUGH THE LINES AND GET WORDS TO DISPLAY ON TOP OF THE IMAGE AS OVERLAY
- ..........................
- ..........................
- ..........................
- });
- ..........................
- ..........................
- ..........................
- YOUR CODE HERE
- ..........................
- ..........................
- ..........................
- });
- }
- }
- });


